State Supervisor Tasks
Select a topic.
A notification appears on your Notifications screen when a staff member submits an access request. Select Review Request inside the notification to open the request details.
At a minimum, the standard Review Request screen displays:
- Request Number
- Name of Application
- Requester
- Recipient of the access request
- Request Date
- Request Type
- History of actions performed against the request
Other fields will be available depending on the user and request type. (If you are supervising contractors, you will also approve their profile from this page.)
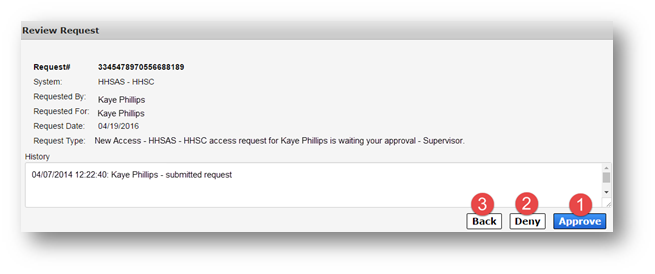
Select Approve to approve the request ("1" on the above screen).
The Add Details window will open. Entering details is not required if you are approving the request. Select OK to complete the approval.
Select Deny to deny the request ("2" on the above screen). This will prompt the Add Details window to open. Details are required if you are denying the request. Select OK to finalize the action.
If you're not ready to commit…
Select Back to exit the request without performing an action ("3" on the above screen).
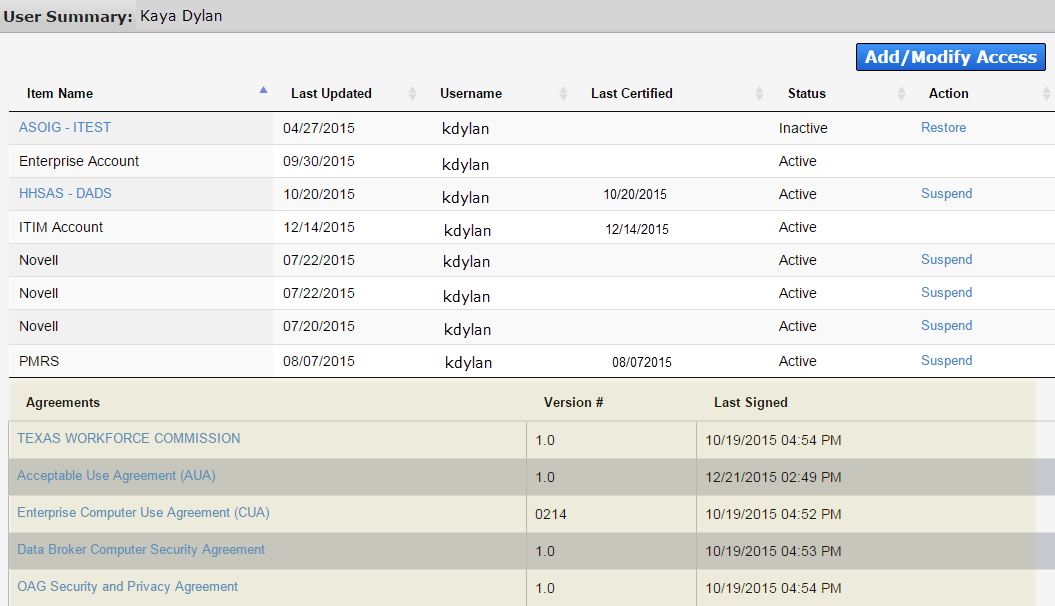
You can add, modify, suspend, or restore your staff member's access to HHS applications by submitting an access request via the portal.
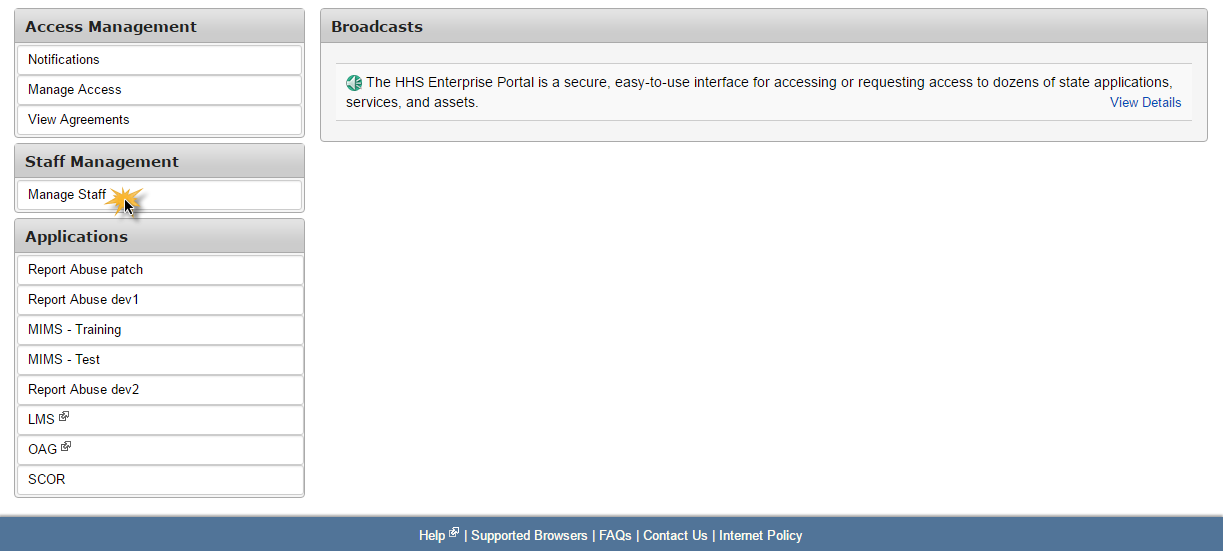
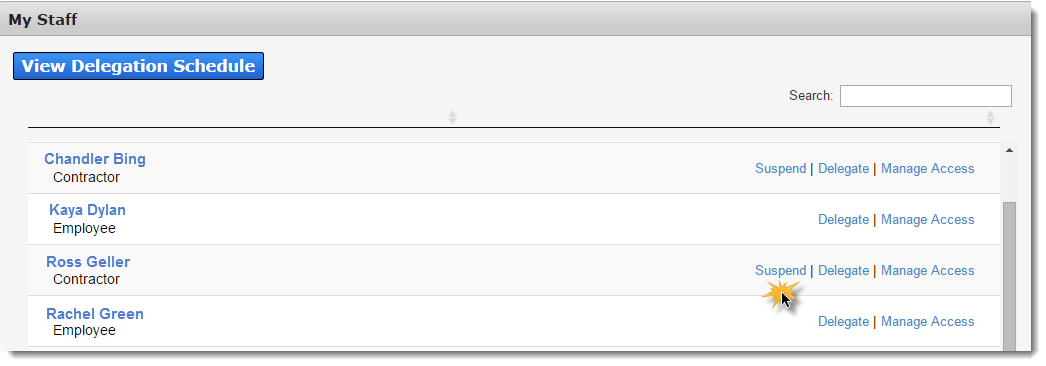
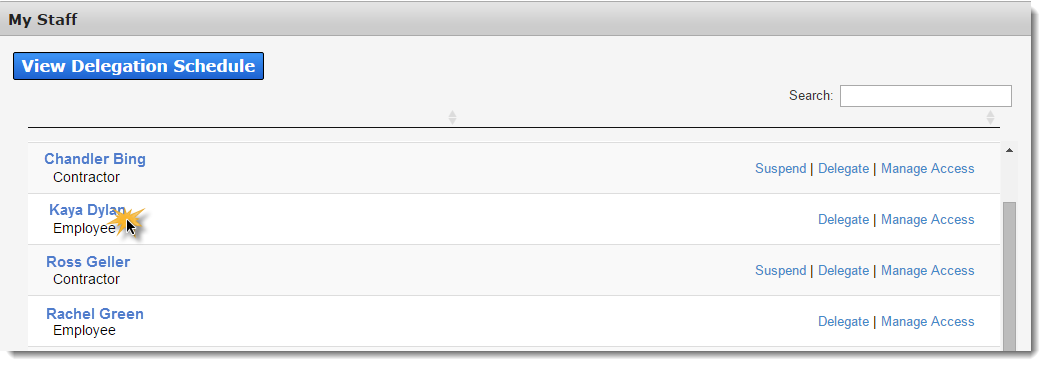
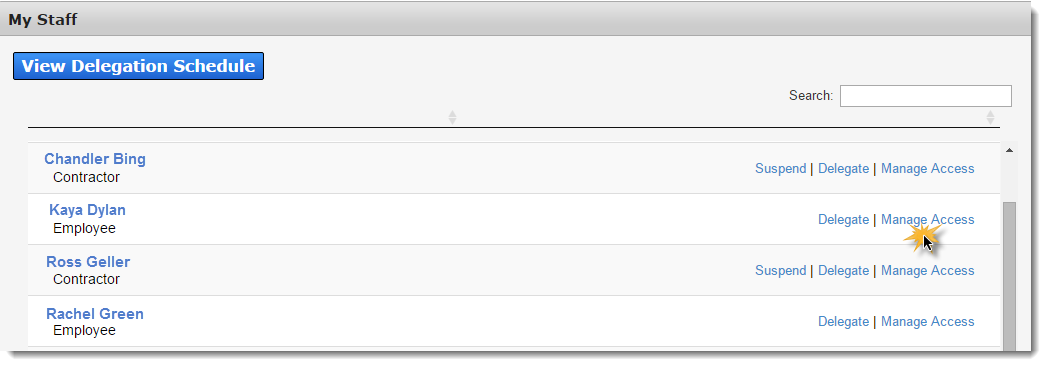
Click the Manage Staff link under Staff Management on the Main Menu.
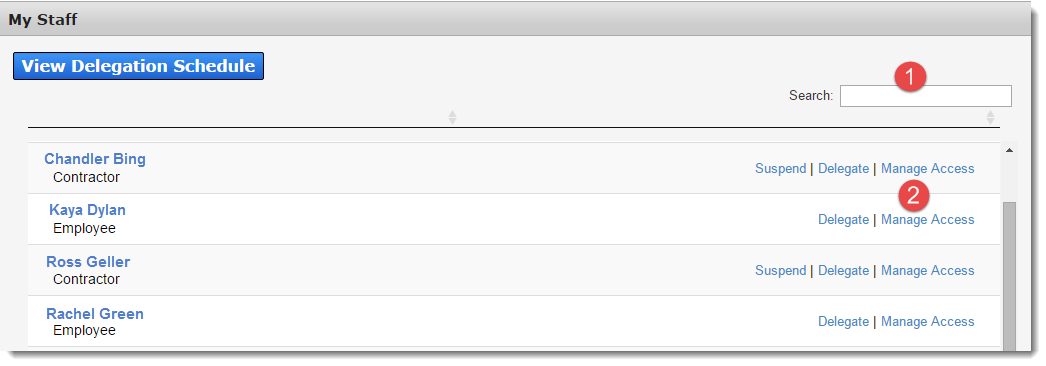
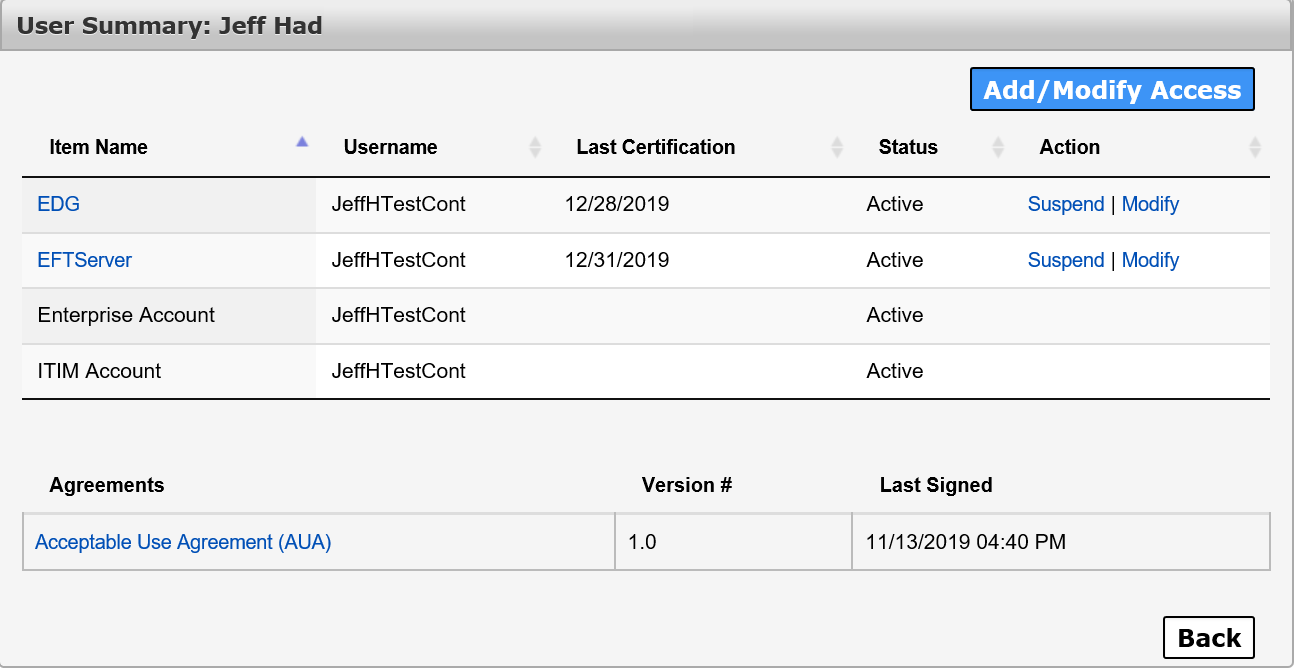
On the My Staff screen, use the Search field to find the user (1). Click Manage Access in their row to open their User Summary page (2).
Click Add/Modify Access to open the Select Items screen.
On the Select Items screen:
- Items for which the staff member currently has access are listed at the top in the Existing Access section. Select these items if you would like to modify their existing access. If needed, use the horizontal scrollbar to view the staff member's username for a specific application. You should also select items in these rows if you want to restore or suspend access for this item.
- Items in the New Access section represent new access. Select these items if you want to request new access for your staff member.
- Enter text in the Search field to find a specific application. You may also take advantage of the filter options to narrow your results.
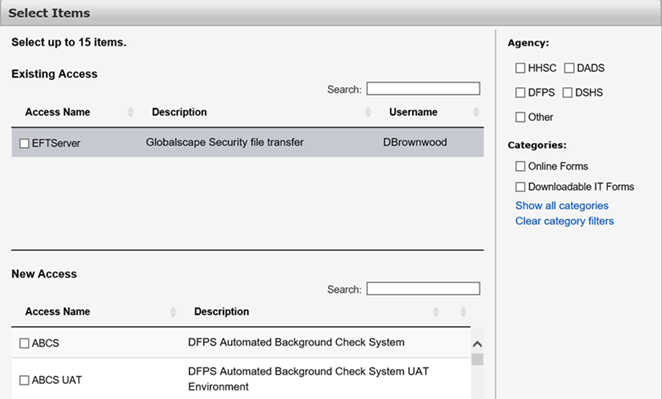
Select Next when you have completed making your selections.
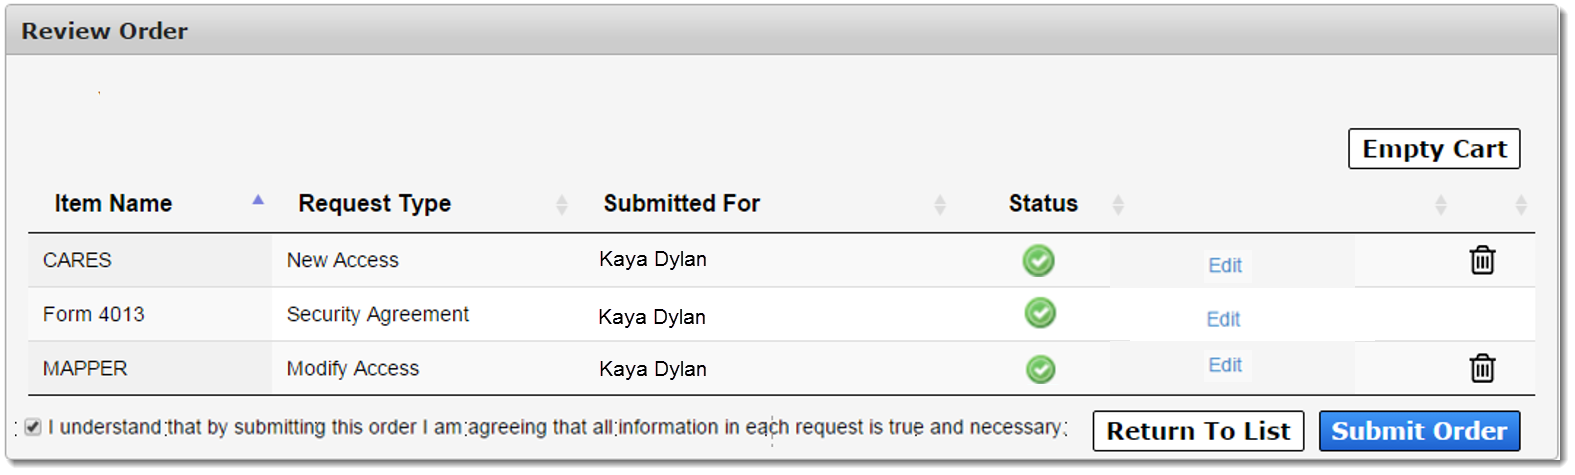
On the Review Items screen, items that require additional information have Information Required links in their row. Select each of these links to provide the necessary information. The process for providing this information differs from app to app.
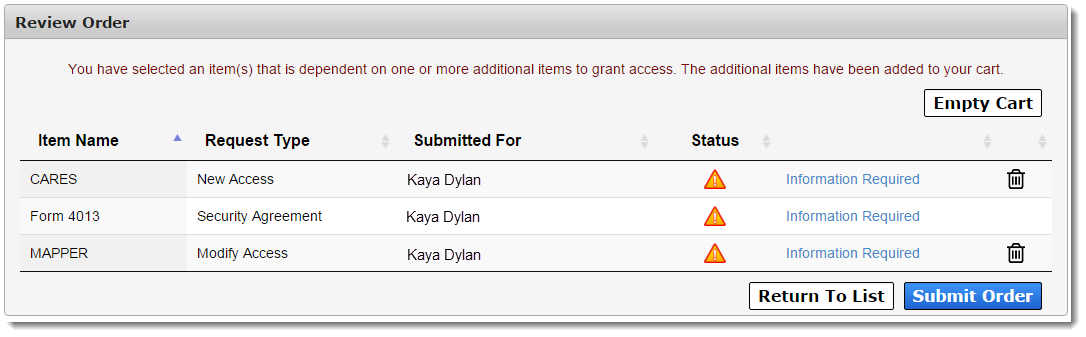
Other actions you can perform on this screen include:
- Select the trashcan icon to remove a single item from your cart.
- Select Empty Cart to remove all items from your cart.
- Select Return to List to add more items to your cart.
After you have entered the required information for all items in your cart, a confirmation message will appear. Read and click the box beside the message to agree to its terms. Select Submit Order to finalize the request.
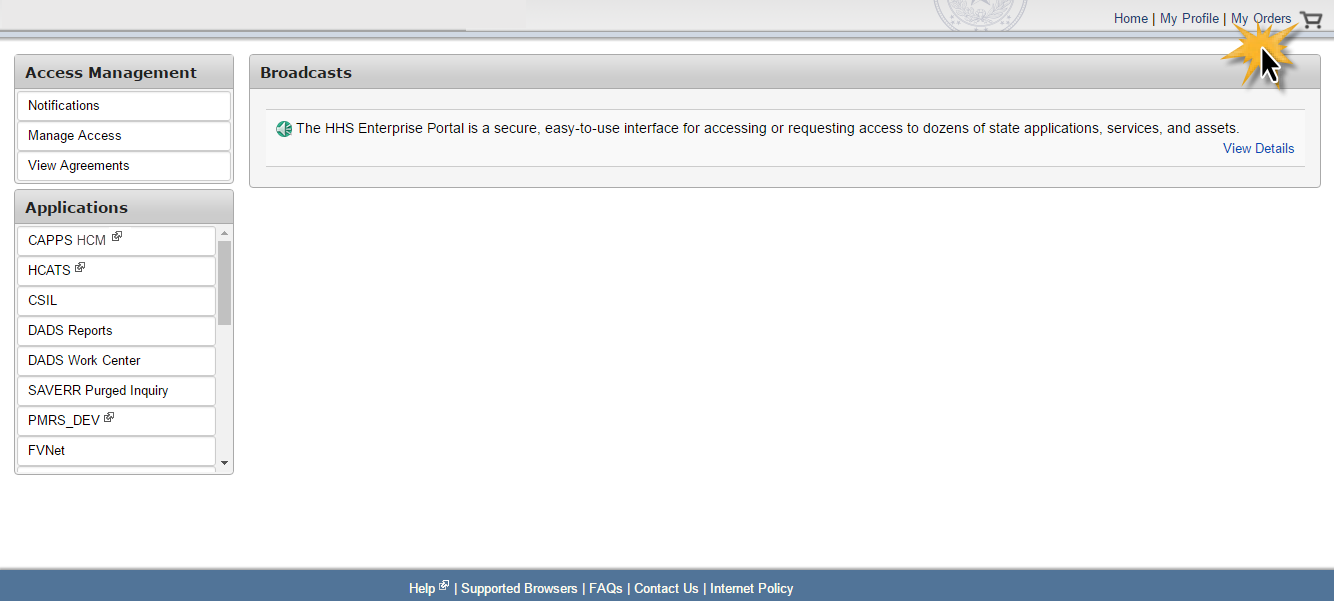
When an update has been made to your order, you will be informed via email and portal notifications on the Notifications screen. You may also check the status of your order and requests by selecting the My Orders link at the top right of any portal screen.
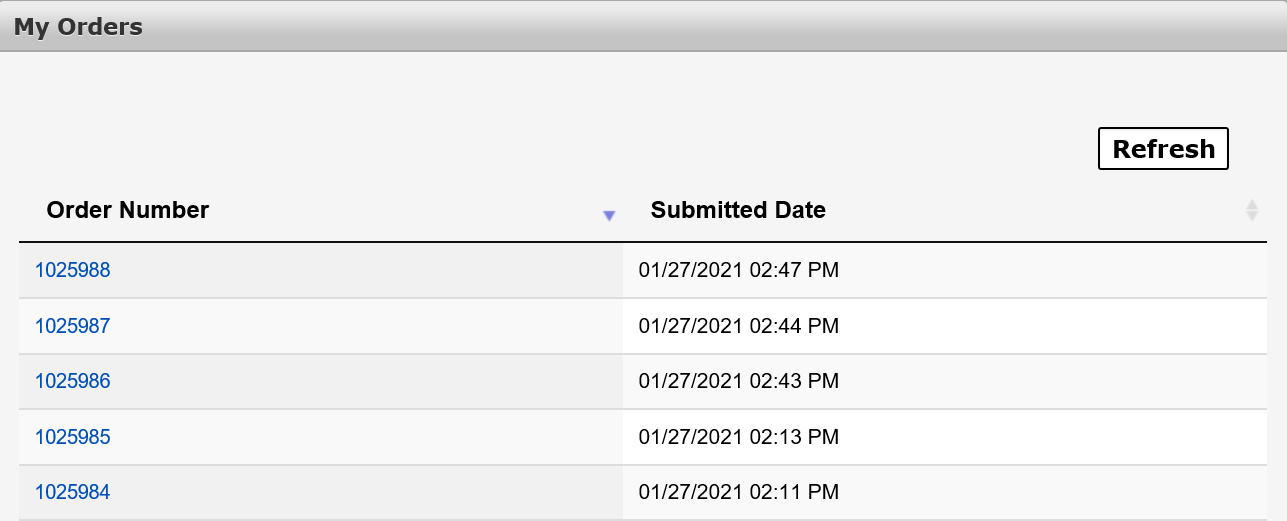
On the My Orders screen:
Orders that you created within the last six months are displayed, starting with the most recent.
You can rearrange the list from oldest to most recent by selecting the arrows beside Order Number or Submitted Date. If the status is In Progress, you also have the option to cancel the order.
Select the Order Number to open details about a specific order.
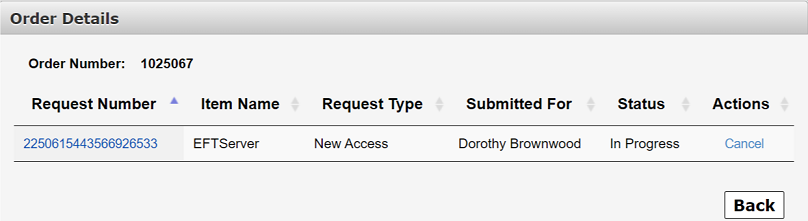
On the Order Details screen:
Order details include the request number, item name, request type, who the request was submitted for, the status, and actions taken against the request.
Select the Request Number in the row of a request to view more information.
On the Request Detail screen:
Request details include the history, received/completed date, who the request was completed by, and its status.
Select View Details in the row of an activity to learn more information on that specific activity.

The Certification process is a unique feature on the portal designed specifically for Supervisors. It’s a way of ensuring your staff has the right access to the right applications. In order to ensure a staff member’s access is current, you are required to review each employee's access on an annual basis, within 30 days of the anniversary of the employee's hire date. After you have reviewed the access, you must decide if the access should be certified, suspended, or, in some cases, modified.
When a staff member’s access is up for review, you will receive an email reminder and a notification on the Notifications screen of the portal. Click Notifications to view your notifications and certification requests. Some users may have multiple accounts for one application. Look at the username listed in each application’s row to help you keep track of which account you are reviewing.
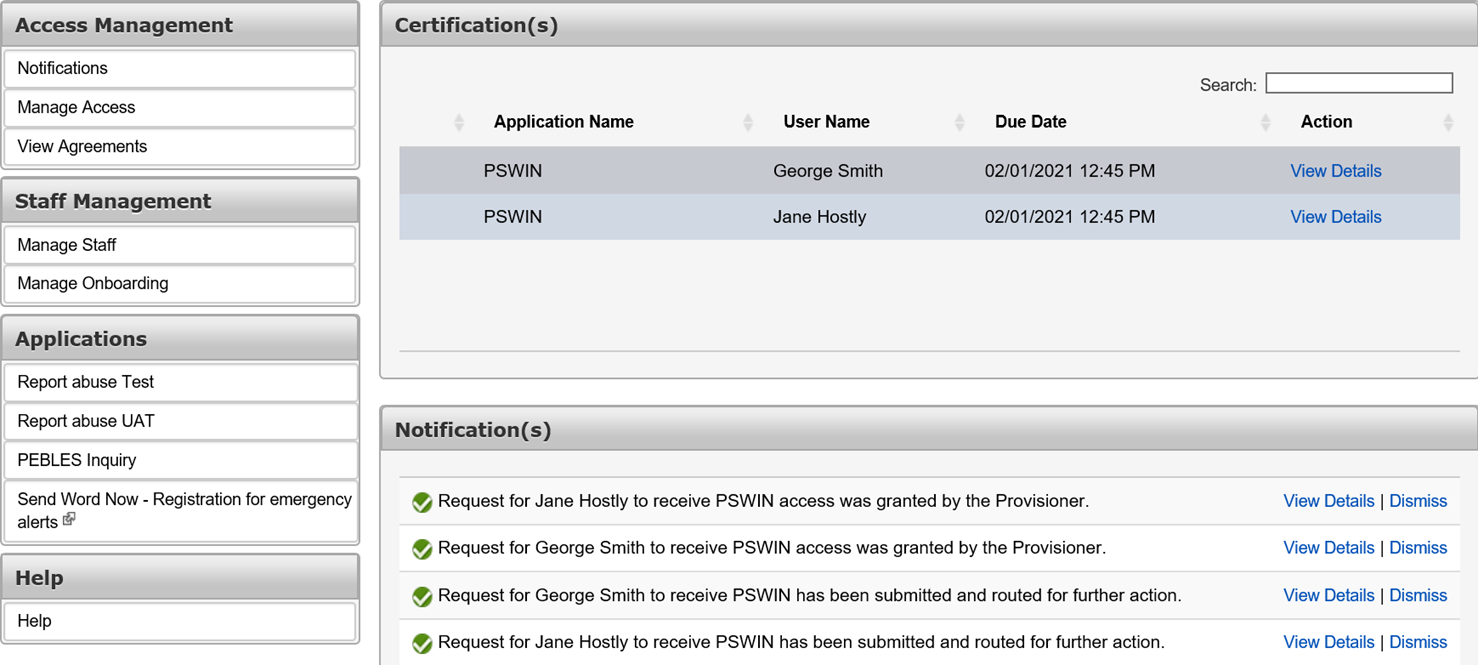
Click View Details to access the staff member’s Certify Request screen.
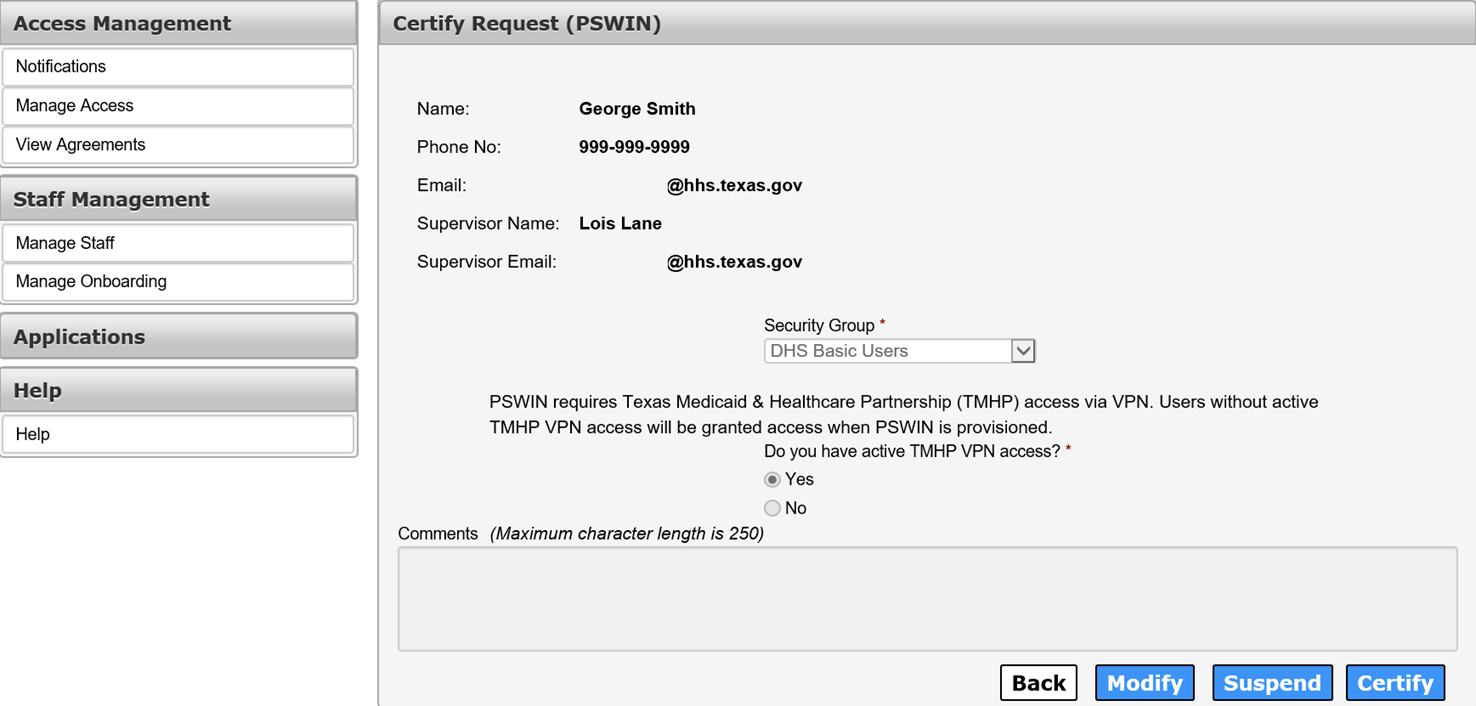
Click Certify. You can also Suspend or Modify access from this screen.
You can only suspend portal access for HHS Employee via CAPPS HCM.
To suspend or restore an HHS employee's access to individual applications, select the Suspend/Restore option on their User Summary page, or submit an access change request.
The HHS Enterprise Portal allows you to delegate tasks to your staff members, but what does that really mean?
As a Supervisor, you probably receive a multitude of access requests through the portal, all which require attention within a designated period. When you do not perform actions on these requests, the request is canceled, and the requestor must request the access again, which can be time-consuming (not to mention, make you unpopular among your team).
The portal's delegation feature helps you circumvent that problem by allowing you to delegate a staff member to perform your tasks during periods when you are unavailable.
Before you assign a delegate, however, keep in mind these basic guidelines:
- Assigning a delegate means all requests customarily sent to you will instead be forwarded to the delegate during a defined time frame.
- Requests submitted before the start date/time do not transfer to the delegate.
- Requests forwarded to the delegate during the delegation period will remain assigned to the delegate until the requests are completed, rejected, or expired.
- Delegates can only approve or deny requests; they cannot initiate requests on your behalf.
- As the delegator, you are responsible for approvals made by the delegate.
Furthermore, the delegation periods last up to 180 days. To extend the date passed the 180-day mark, change the end date after the delegation period has started.
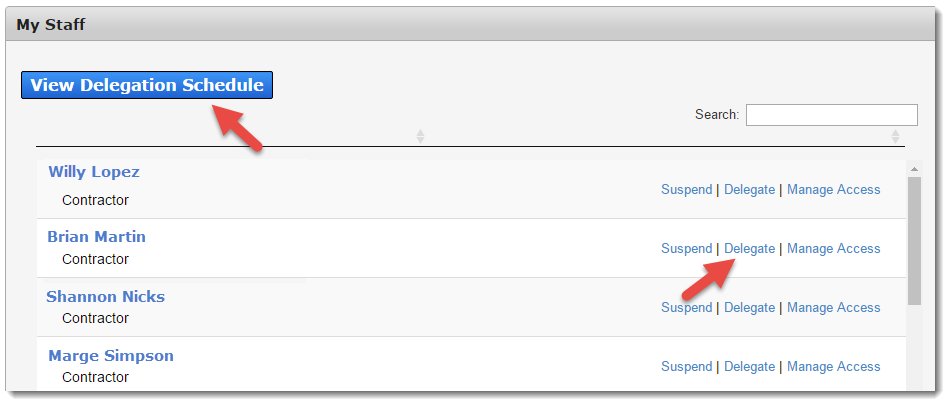
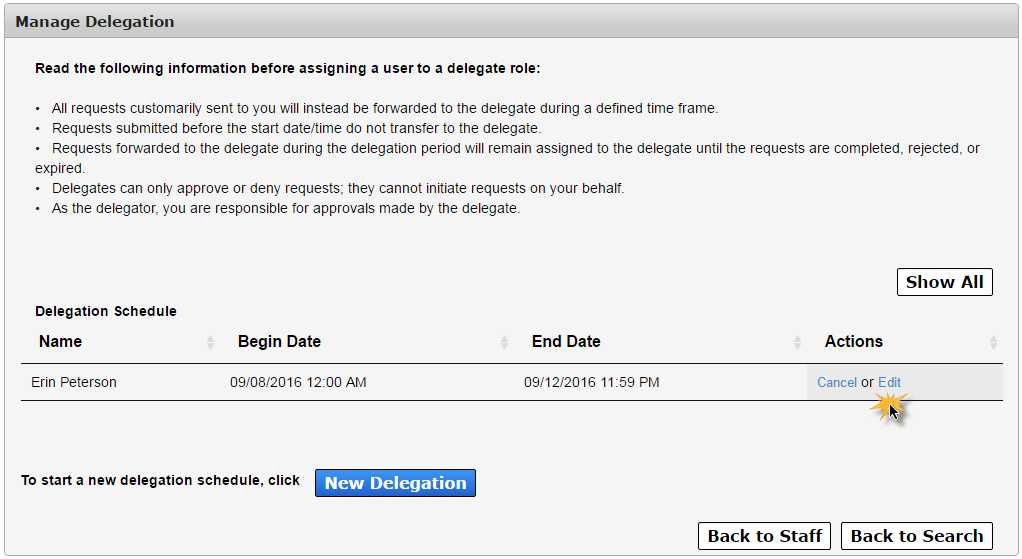
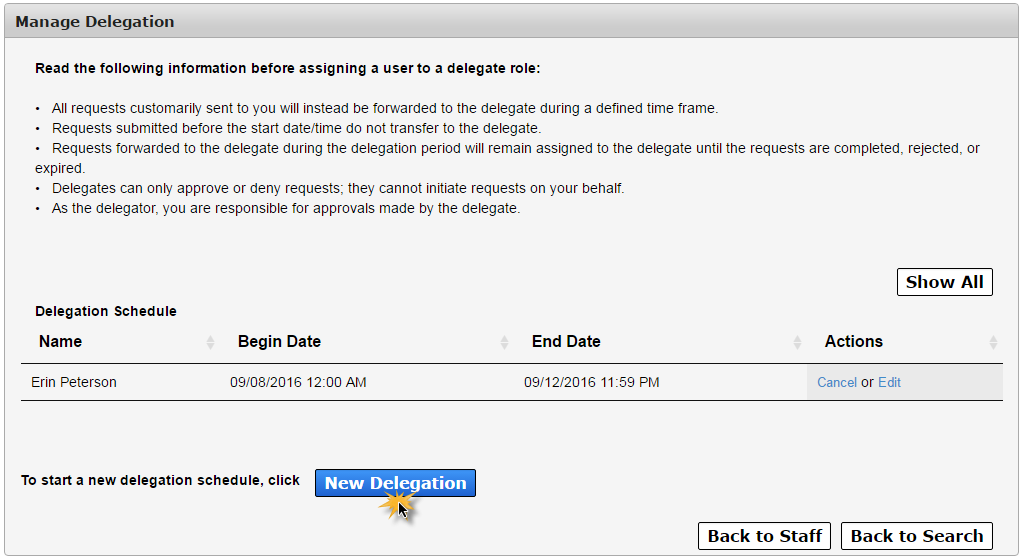
A list of current delegates and their delegation periods are shown on the Manage Delegation screen.

To access this screen, select the Delegate link on the top right of any page in the portal, or click Manage Staff under Staff Management on the Main Menu, then select the View Delegation Schedule button (seen below) or the Delegate link in the row of the user that you want assign as a delegate.
Select Show All.

Select Cancel under Actions in the row of the assignment that you wish to cancel.
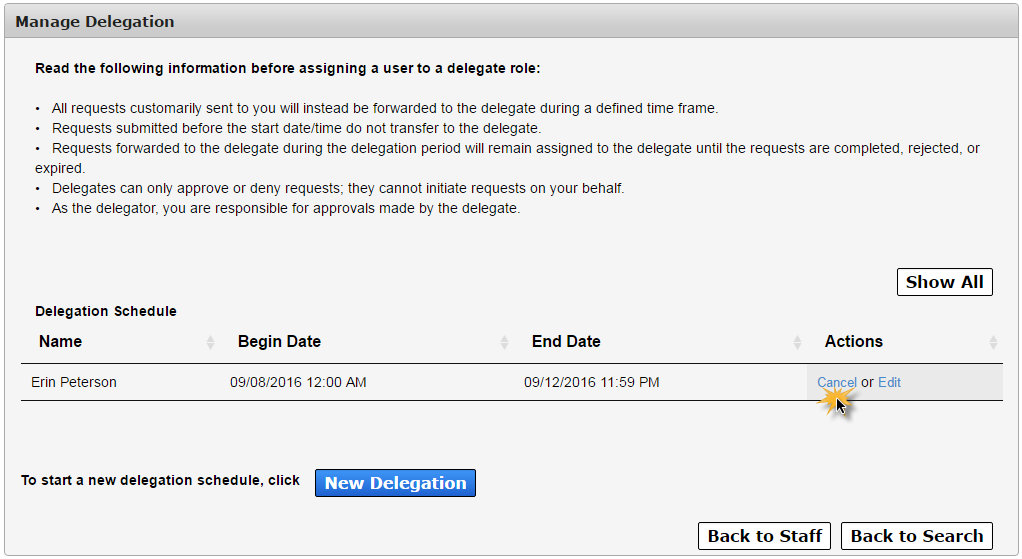
Select Edit under Actions in the row of the assignment that you wish to edit.
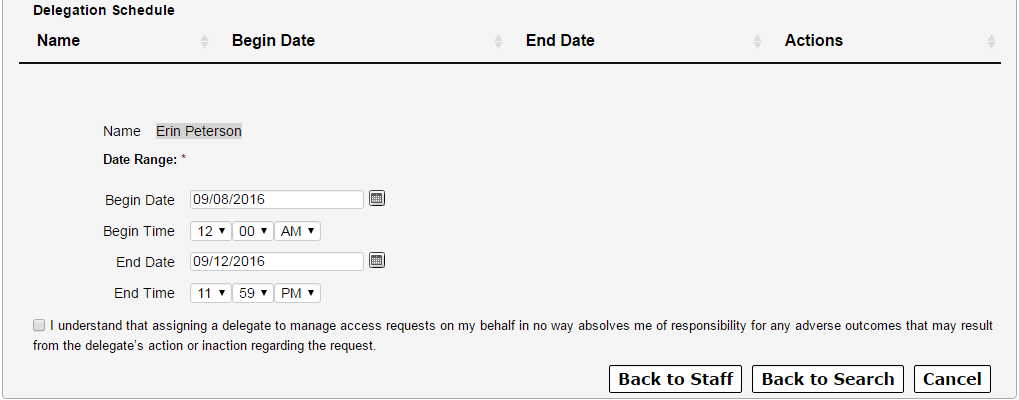
This action opens the Delegation Details screen, where you can make adjustments.
Select the New Delegation button.
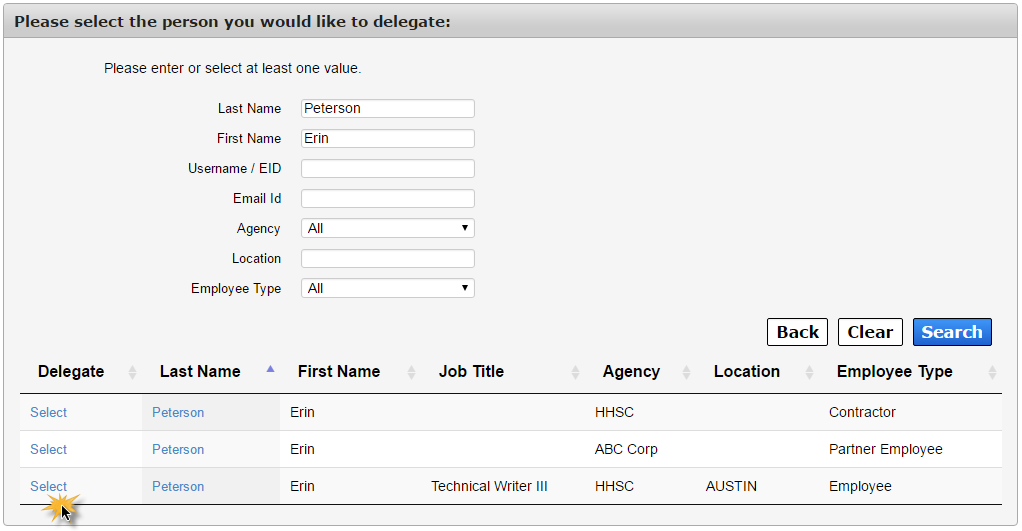
This actions opens the Delegate Search screen.
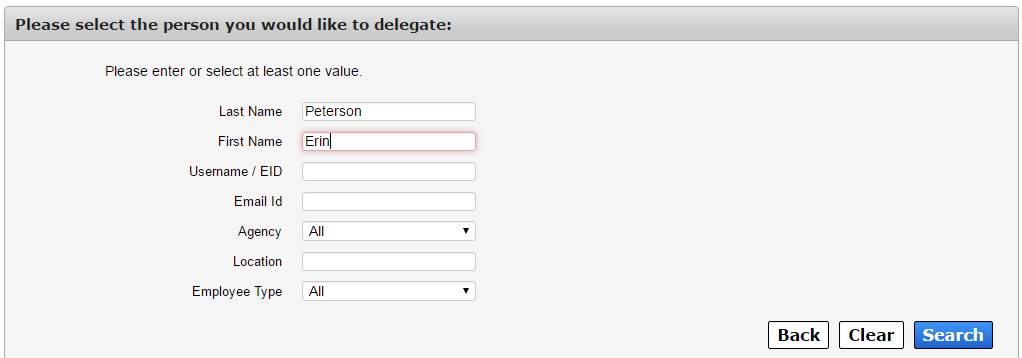
Add search criteria in the fields provided. Select Search when you are ready.
A list of search results will appear. Select the delegate’s last name to view their information, confirming you have found the correct delegate.

Click Select in their row to begin the delegation assignment process.
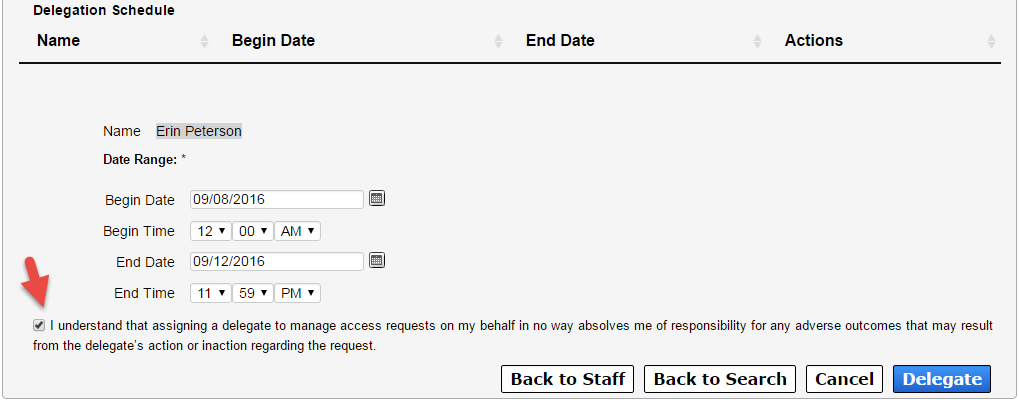
Add the start/end dates and times in the fields provided.
Review the agreement and check beside it to agree to its terms. The Delegate button will not appear and you will not be able to submit the form until this item has been checked.
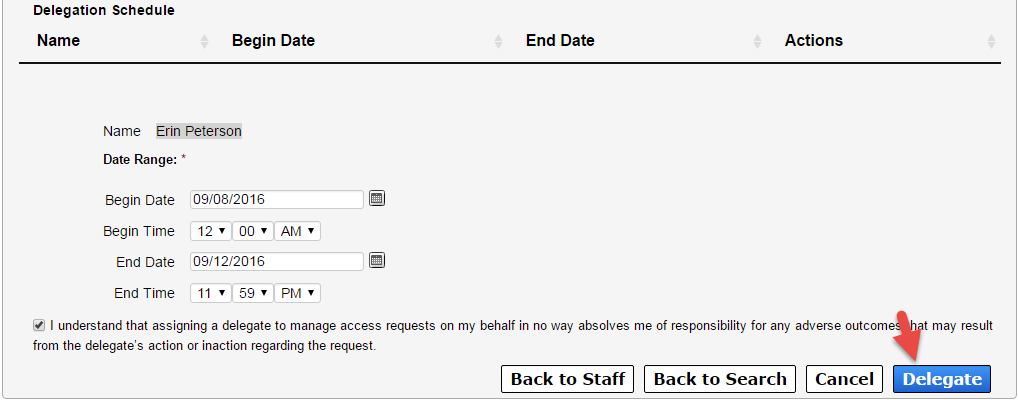
Select Delegate to finalize the assignment.

On the Main Menu, select Manage Staff under the Staff Management tab.

On the My Staff screen, click the Manage Access link in the row of the staff member whose agreements you would like to view.
Agreements are located at the bottom of the staff member's User Summary page. Information includes the version number and the date it was signed. Click on the agreement's name to view details and download or print the agreement.