FAQs
Select a topic:
- Select the Forgot Password link on the portal's Welcome page.
- On the next page, enter your username and click Next.
- The next step will differ depending on the type of user. All users may reset their password by answering security questions; however, HHS employees can also reset their password by providing personal information.
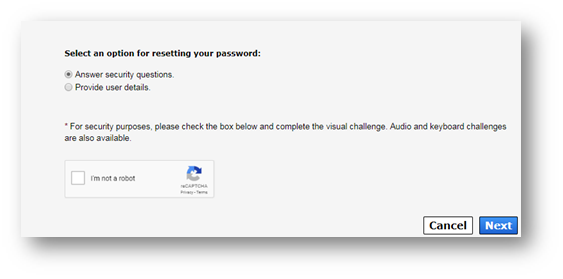
Select an option for resetting your password.
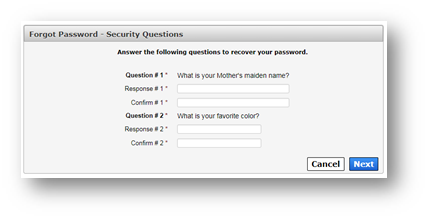
- To reset your password by answering security questions, keep the Answer security questions option selected and check the box beside I’m not a robot. You will then be given a quick verification test to prove you are not a computer. When you have successfully answered the test, click Next. On the next page, answer your security questions. You are required to provide the correct answer twice for each question. Click Next when you are ready.
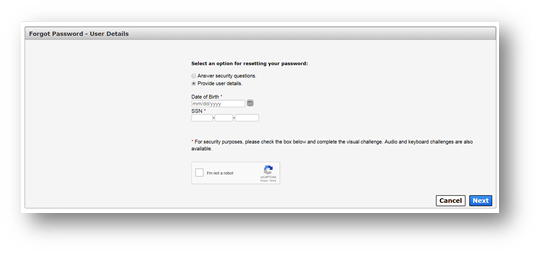
Select Provide user details to reset your password by entering your date-of-birth and social security number if you are an employee, or by entering your email and phone number if you are not an HHS employee. The screen will change to reflect the required fields. After you provide the information, check the box beside I’m not a robot. You will then be given a quick verification test to prove you are not a computer. When you have successfully answered the test, click Next.
- To reset your password by answering security questions, keep the Answer security questions option selected and check the box beside I’m not a robot. You will then be given a quick verification test to prove you are not a computer. When you have successfully answered the test, click Next. On the next page, answer your security questions. You are required to provide the correct answer twice for each question. Click Next when you are ready.
-
Check your inbox for an email (Non-HHS employees will receive an encrypted email) with a temporary password for accessing the portal. Sign in to the portal with the temporary password. The portal will prompt you to change your password.
They are now located on the Notifications page. Click Notifications under Access Management on the Main Menu to access the page.
Select the My Profile link at the top of any screen in the portal. On the My Profile page, select the Change Security Questions link on the top right.
Some fields enable editing, allowing you to change the information from the My Profile page. If you need to edit an item in a field where editing is disabled, you'll need to contact your supervisor and request that they perform this action on their end. Since most of the disabled fields are populated with information from CAPPS HCM, it may not be possible to edit the information you want changed.
Call the Help Desk at 512 438 4720 to start the process.
See Register for a Portal Account under Portal Accounts.
If you're an HHS employee, your Employee ID is your username. If you're not an HHS employee, you can create a username when you register on the portal.
Sign into the portal and select the My Profile link at the top of the screen. On the My Profile page, select the Change Password link on the top right.
The portal acts as a hotspot that allows you to access all of your applications in one place. You'll also be able to add new applications, or modify and remove existing ones.
The Sign AUA link was added to the Welcome screen to meet the needs of HHS employees who meet the following criteria:
- Need to sign the AUA
- Do not anticipate requiring portal access to perform their job functions
If you are already a registered HHS Enterprise Portal user, it's unlikely you need to sign the AUA unless notified otherwise. Re-signing of the AUA is only required on an annual basis or if there have been major changes to the terms and conditions of the agreement.
Depends on the application. Go to the list of the applications and select the application where you need your password changed for more information.
Did they leave for good good, or just leave for a short vacay? If Elvis has permanently left the building, you'll need to inquire as to who is filling your new Supervisor's role and contact them to ensure the powers-that-be add you his/her ledger. If your Supervisor is temporarily MIA, you'll have to wait until he/she returns, or contact the person who is filling in for him/her while they are away.
Select Manage Access under Access Management on the Main Menu. To read the complete steps, see My Applications.
Have you received a notification that you have access to it? If you have and still don't see it, it's possible that the application is currently offline. Wait and try again later, or contact the Help Desk if the issue continues.
Select My Orders on any portal page. On the My Orders page, select MODIFY in the row beside the order you would like to modify.
Try logging off, then logging back on. If that doesn't work, contact the Help Desk.
Your request was probably submitted the first time you sent it. Sometimes the system can’t catch up with the interface. We’re working to solve this issue. In the meantime, please do not resubmit a request right away. Wait 30 minutes for a confirmation email (don’t forget to check your SPAM folder) before attempting to resubmit.
You can request access to certain applications via the portal that aren’t actually available for accessing through the portal after access has been granted. The HHS Enterprise Portal is fairly new, and we are still in the migration stage of adding HHS systems to the site. Until your application has been added, please attempt to access it outside of the portal.
Most access to applications can be restored through the portal. Follow the access request instructions. If you do not see the restore option, then you will need to contact your Supervisor and ask them to initiate the restoration process for you.
Click here to download the instructions.
If you have signed one recently (say, in the last couple of months), then probably not. You only need to sign the AUA if a change has been to the conditions or if a year has passed since you have last signed it—which, in either case, the portal will let you know via email. The Sign AUA button is for first time portal users.
Role-Specific Tasks:
Never select Certify multiple times, unless you want to receive a hoard of confusing confirmation emails.
Also important to know, the Certify link will never go away, so you must rely on the Last Reviewed date to confirm you have certified the access.
To see an updated review date, wait a minute after you have certified the access, then select Refresh to refresh the screen. An updated reviewed date will appear under the Last Reviewed column.
You can add, modify, suspend, or restore your staff member's access to HHS applications by submitting an access request via the portal. Some applications do not allow suspend/restore requests via the portal. In these cases, contact the application's administer for further instructions.
Step 1
Click the Manage Staff link under Staff Management on the Main Menu.
Step 2
On the My Staff screen, use the Search field to find the user. Click Manage Access in their row to open their User Summary page.
Step 3
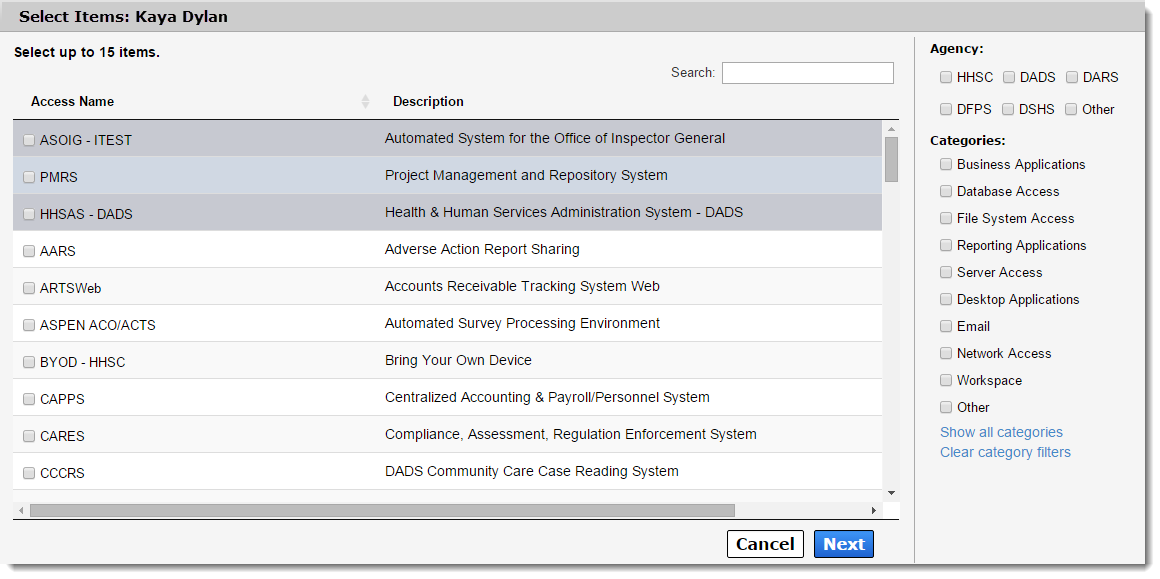
Click Add/Modify Access to open the Select Items screen.
Step 4
On the Select Items screen:
- Items for which the staff member currently has access are listed at the top in highlighted rows. Select these items if you would like to modify their existing access. If needed, use the horizontal scrollbar to view the staff member's username for a specific application. You should also select items in these rows if you want to restore or suspend access for this item.
- Items in non-highlighted rows represent new access. Select these items if you want to request new access for your staff member.
- Enter text in the Search field to find a specific application. You may also take advantage of the filter options to narrow your results.
Step 5
Select Next when you have completed making your selections.
Step 6
On the Review Items screen, items that require additional information have links under Status in their row. Select each of these links to provide the necessary information. The process for providing this information differs from app to app.
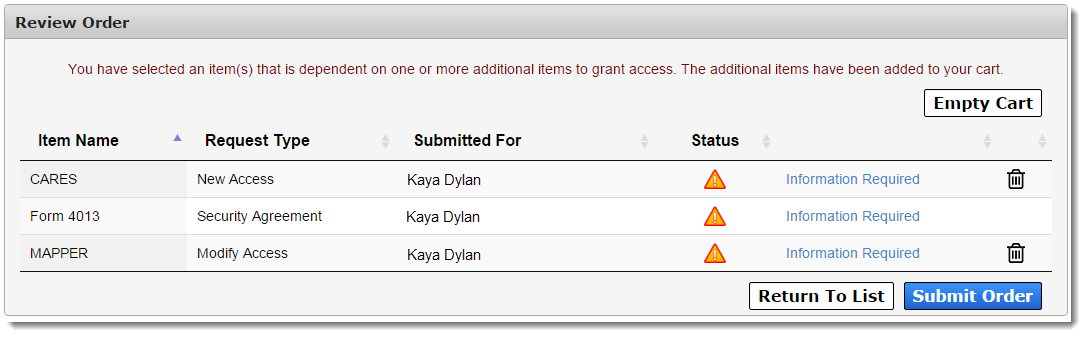
Other actions you can perform on this screen include:
- Select the trashcan icon to remove a single item from your cart.
- Select Empty Cart to remove all items from your cart.
- Select Return to List to add more items to your cart.
Step 7
After you have entered the required information for all items in your cart, a confirmation message will appear. Read and click the box beside the message to agree to its terms. Select Submit Order to finalize the request.
You will receive an update via portal notification and email within 10 days of submitting the order. You may also review updates at any time by selecting the My Orders link at the top right of the screen.
How do I review access requests?
A notification appears on your Notifications screen when a staff member submits an access request. Select Review Request inside the notification to open the request details.
At a minimum, the standard Review Request screen displays:
- Request Number
- Name of Application
- Requester
- Recipient of the access request
- Request Date
- Request Type
- History of actions performed against the request
Other fields will be available depending on the user and request type. (If you are supervising contractors, you will also approve their profile from this page.)
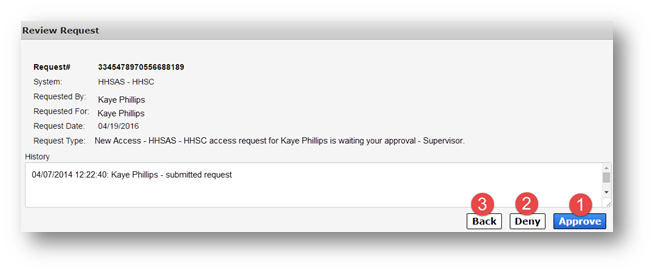
Approve the Request
Select Approve to approve the request ("1" on the above screen).
The Add Details window will open. Entering details is only required if you are rejecting the request. Select OK to complete the approval.
Deny Access Request
Select Deny to deny the request ("2" on the above screen). This will prompt the Add Details window to open. Details are required if you are denying the request. Select OK to finalize the action.
If you're not ready to commit…
Select Back to exit the request without performing an action ("3" on the above screen).
Follow the same process you would use if you were adding or managing access. When you arrive at the More Information screen, select the Remove Access option.
On the Home page, select Review Request next to the request notification. On the Review Request page, the fields are prepopulated with the staff member's selections. You can make changes to these options on MOST app requests. Some applications limit a supervisor or approver's ability to modify the request details.
Sure! Just start the request process by selecting Manage Access under Access Management on the Main Menu. See Applications for more information.
Follow the same process you would use if you were adding or managing access. When you arrive at the More Information screen, select Remove Access.
On the Home page, select Review Request next to the request notification. On the Review Request page, the fields are prepopulated with the staff member's selections. You can make changes to these options on MOST app requests. Some applications limit a supervisor or approver's ability to modify the request details.
Sure! Just start the request process by selecting Manage Access under Access Management on the Main Menu. See Applications for more information.
You can only request access for applications that you provision. If you do not see the application on the Select Items page, it means you do not have the rights to request access. If you believe this is a mistake, contact the Help Desk at 512-438-4720.
No. You need to enter the username and password for the account you are setting up.
More than likely, when you set up the account and were prompted to enter a username and password, you entered your username and password when you were supposed to enter the user's. To fix this issue, contact the Help Desk at 512-438-4720.
The portal only displays tasks that are pending.I cannot see tasks that I saw during a previous session…Once a task is completed, it is no longer viewable on the portal. If you can no longer see a task, it probably means another provisioner has already completed it.
This section is still a work in progress. Do you have any Help Desk-specific questions that you would like to see? Please send us an email.
Information Coming Soon